
AI Prototyping with your real components
How to make your engineering team 100% happier with your prototypes

Hey, I’m Colin! I help PMs and business leaders improve their technical skills through real-world case studies. Subscribe to paid to get access to the AI Product Circle community on Slack, my full Tech Foundations for PMs course (84 lessons), a prompt library for common PM tasks, and discounts for live cohort-based courses.
Last year, I shared a lot of guidance on using component libraries with AI prototyping tools to improve the quality and consistency of your prototypes.
Today, teams are beginning to move towards using their real code in prototypes instead of AI generated code. What does this mean?
Instead of asking the AI to create a button or chart for you, you import your existing code components to your prototyping tool. This gives you two critical benefits:
You know that the prototype will look exactly like your product
The code has actual value to the engineering team
The main problem with AI prototyping is that it’s fast to spin up a new idea, but the artifact itself has no real value. The code generated doesn’t use your real colors, components, or systems. So if you give it to an engineer, they basically have to start from scratch.
This new wave of prototyping uses real components so that hand of to engineering has actual value. They can use the prototype as an accurate reference for implementation and even point their coding agent (aka Claude Code) at it to implement directly.
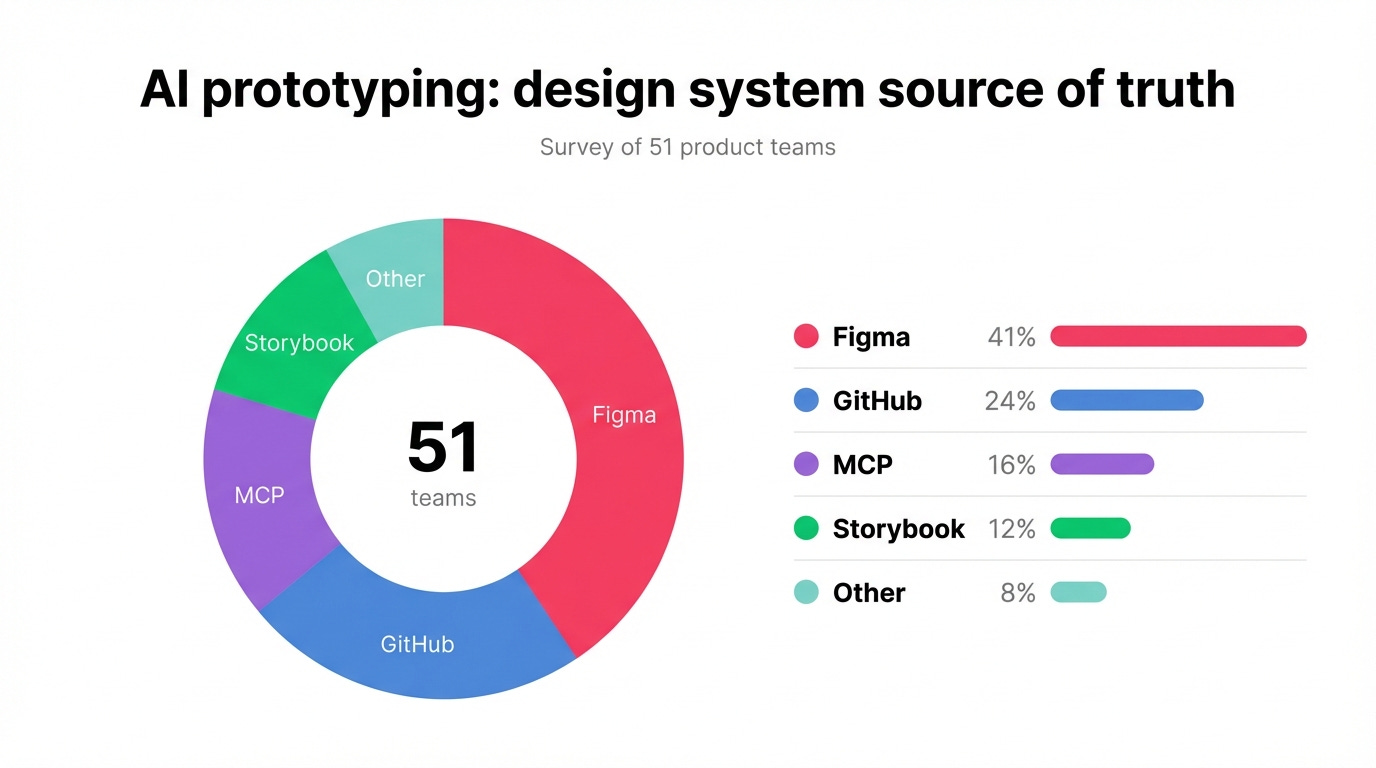
This isn’t theoretical. Based on a small subset of data from a popular AI prototyping tool, only 41% of teams selected Figma as their import source when adding a design system. A combined 36% were code (Github + Storybook), and another 16% were MCP.
In this post, I want to break down nine ways you can use a design system with AI prototyping tools, including MCP, skills, and more.
Let’s dive in.
1. Screenshots
Taking a screenshot of your existing UI and pasting it into an AI tool is the lowest-friction starting point. You screenshot your dashboard, paste it in, and ask your AI to recreate the layout. AI returns a visual approximation typically built with shadcn/ui.
The AI has no knowledge of your actual components, tokens, or design system. The output will use whatever default stack the tool prefers (almost always shadcn/ui plus Tailwind) and you’ll spend more time retrofitting the result to your design system than you saved.
This can be useful if you want to a scrappy idea quickly, not when you need design system accuracy.
Best for: Early exploration when you don’t care about design system fidelity. Communicating a rough layout idea you plan to refine with a real method later.
2. Prompt-only / paste code into chat
You copy-paste your component source code directly into the chat prompt and instruct the AI to use those components. Paste your <Button>, <Card>, and <Input> into AI with: “Here are my components. Build a settings page using only these.”
With this approach, the AI tool needs to read all your components on each prompt, and it likely won’t be able to reconstruct them accurately unless you’re using the exact same tech stack. Even after you provide components, you need to re-prompt explicitly with each specific component, naming what to use and when.
Token limits also cap how many components you can paste. Bolt’s free tier burns through 300K tokens quickly. v0 is “tightly coupled to ShadCN and not flexible in this regard”.
Best for: Nothing really, there are better approaches.
3. npm package + explicit prompting
This was the initial attempt at solving design systems and multiple products shipped support for NPM packages (Figma Make, Bolt, Lovable, etc).
You publish your code to npm, a package registry that allows you to easily install it in other environments. Then you jump into your favorite prototyping tool and tell AI tools to install and use it.
The problem is that all AI prototyping tools have strong defaults and just don’t know how to use your components. In my experience, this led to more errors and headaches than using a screenshot.
Some of this pain can be alleviated with good instructions, but it almost always still falls short.
Best for: Teams with an already-published library who want a low-effort foundation. Pairs best with context files that document component usage patterns.
4. Bolt Design System Agents / Magic Patterns design systems
These are platform-native features that ingest your component library and constrain code generation to your design system. Bolt’s Design System Agents (launched March 26, 2026) let you upload component source files, a Storybook URL, or brand guidelines. The agent “learns” your system and uses your components in subsequent builds.
I gave this a try and the results were not great. Here’s a quick side by side of the Figma mock I had (using a design system) and the Bolt design using a matching Storybook.

Magic Patterns is another tool focused on design systems. You can import a structured set of rules, typography, colors, and reusable components that apply automatically to every generated prototype. Teams create components by importing from Figma or with screenshots, reference them by name in prompts (@LibraryName/Button), and publish versioned updates that can be bulk-applied across all designs using them.
This approach works well, but can be tedious to import and doesn’t match your existing code. The team has a private beta for importing code components that appears to solve this by allowing bulk imports via Figma and MCP.
Both platforms are React-only, limiting your options if you’re on a different stack.
Best for: Design-focused teams who primarily prototype in one browser tool and need the lowest technical barrier.
5. Storybook MCP
The official @storybook/addon-mcp exposes your Storybook component metadata (names, props, descriptions, stories, screenshots) to any MCP-capable AI tool. You install the addon and add the MCP endpoint to your Claude Code. Claude Code then has tools like list_components, get_component_props, and get_component_source.
This is explicitly marked “highly experimental” by the Storybook team. I haven’t done a ton of testing with this, so I won’t share an opinion for now. From what I’ve seen, it’s mostly useful if you want to automatically create new Stories in Storybook, not for prototyping outside of the tool. Feel free to share if you’ve given this a try!
Best for: Teams already invested in Storybook who want cross-tool component awareness. Treat this as an additive layer on top of context files, not a standalone solution.
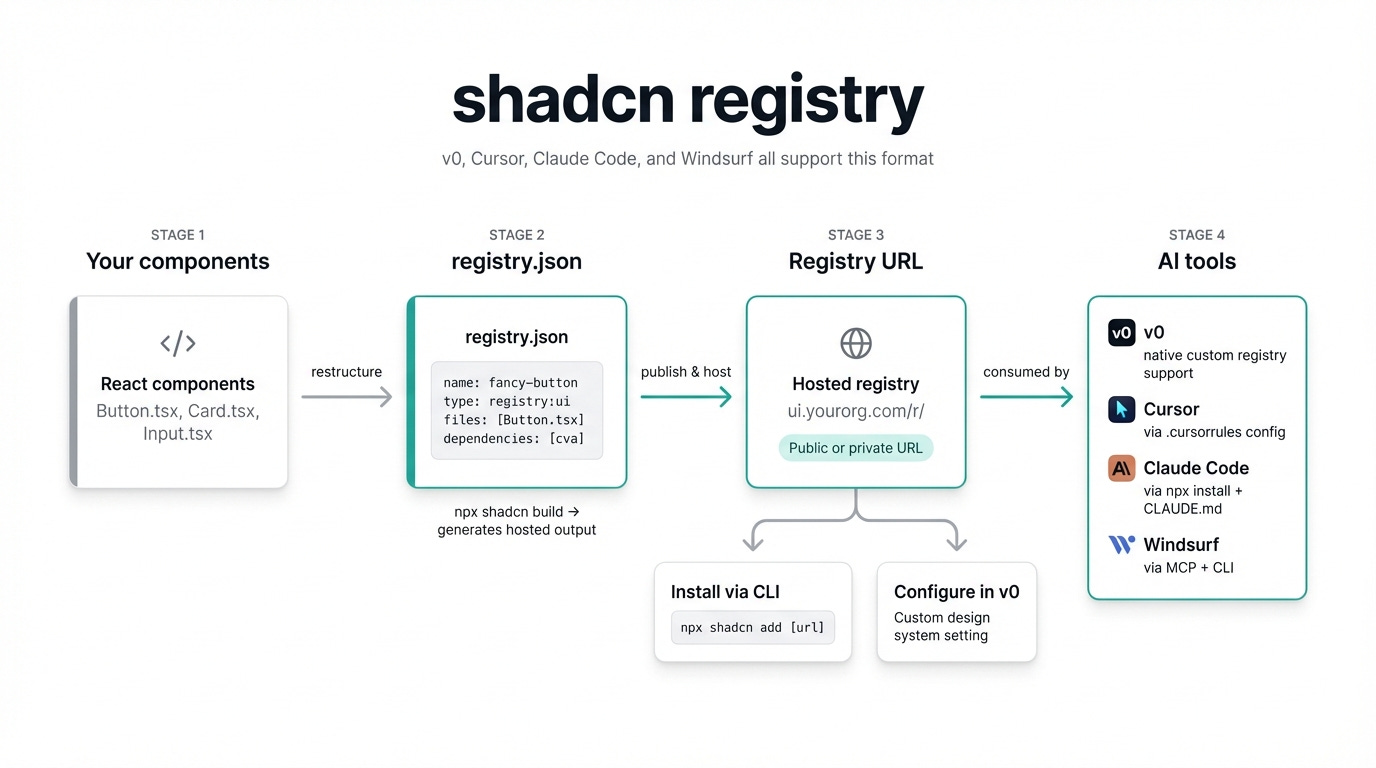
6. shadcn-compatible registry
You restructure your components into shadcn’s registry.json format so they install via npx shadcn add @namespace/component. This lets you easily import individual components as needed for prototyping.
The fundamental constraint is again tailwind and react. If you’re already using a compatible stack, this option can be a good place to start, but many teams are not.
Best for: Teams building on or willing to align with Tailwind/shadcn.
7. Custom MCP server
This is a newer pattern and takes a moment to understand.
You build a custom MCP server that exposes your component library’s metadata as structured tools. Tools like list_components, get_component_props, get_component_source give Claude Code or Cursor on-demand access to your components, usage examples, and anti-patterns.
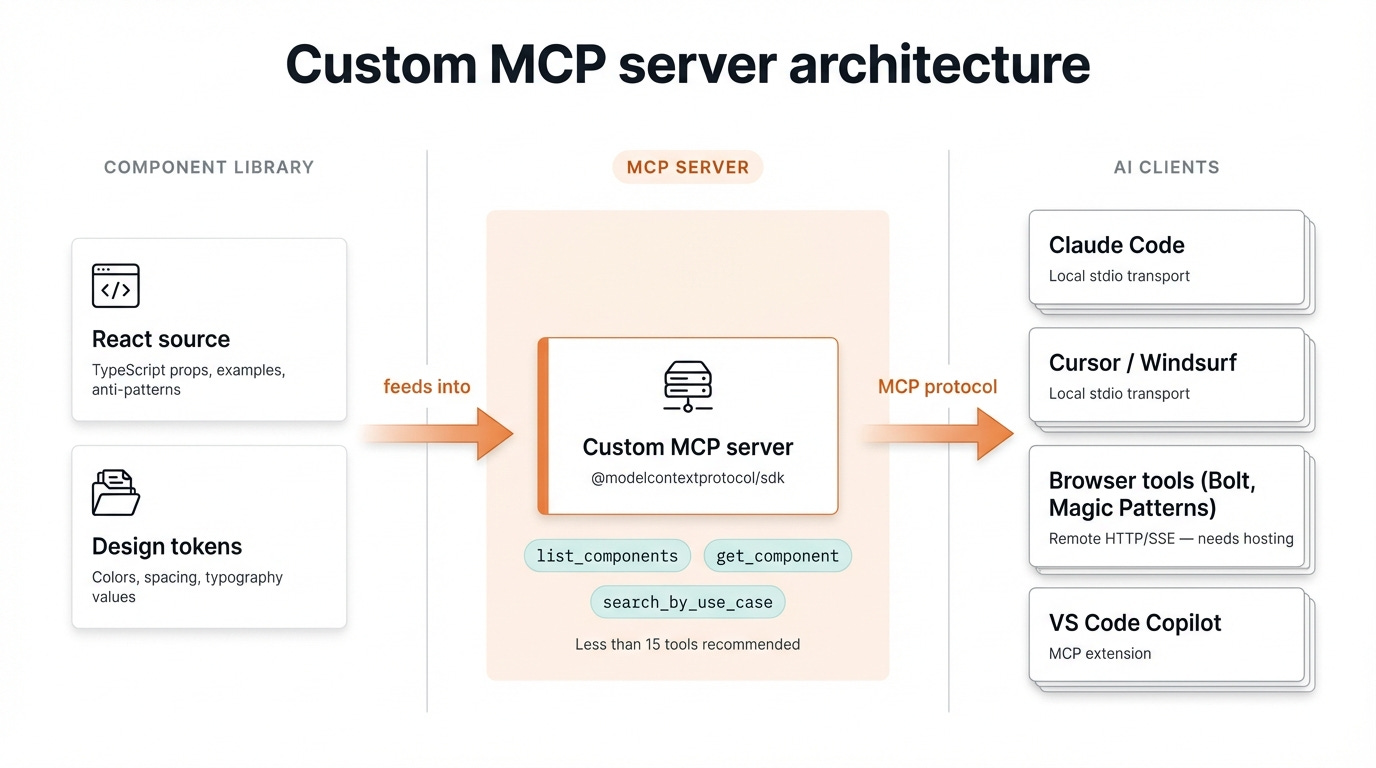
For large component libraries (100+), you should implement pagination or search, as dumping all components at once can exceed the context window on most AI models.
The main downside of MCPs for design systems is the number of queries and tokens your agent will do. You’ll find that Claude Code constantly is reading documentation before doing any prototyping work, slowing down the speed of iteration.
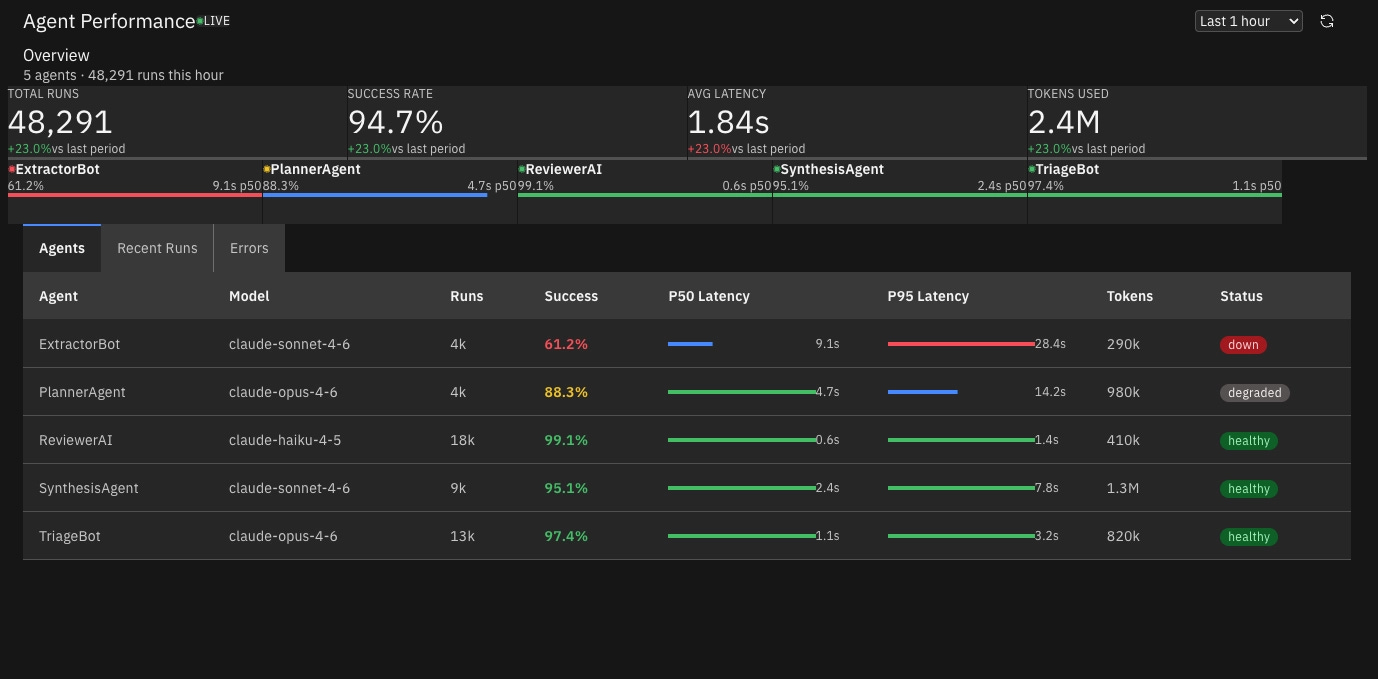
The results are often quite good - here’s another look at the dashboard from earlier:
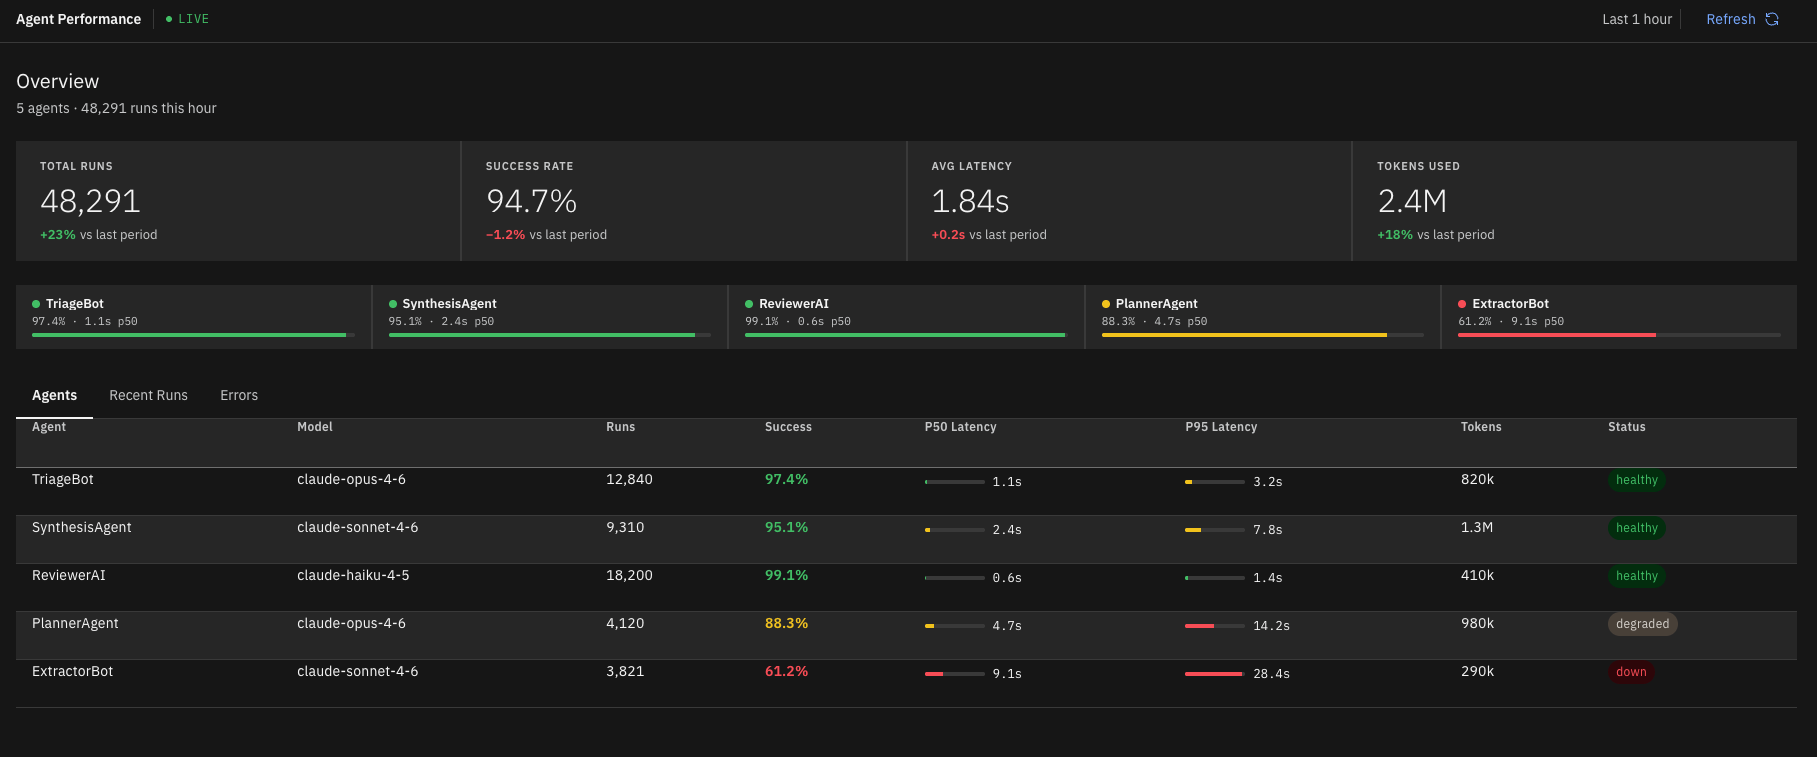
This also requires some technical skill as MCPs are best used by desktop coding agents like Claude Code or Codex.
Best for: Teams comfortable with a little technical complexity and engineering bandwidth to support internal servers
8. Figma MCP + Code Connect + Claude Code
I don’t have access to Code Connect, so I can’t speak much to this workflow. I’ve seen good results, but I know it also take a lot of time and effort to set up.
Code Connect works by creating a .figma.tsx file per component that maps the Figma component to a React import and includes a usage example. After running npx figma connect publish, the AI receives actual import statements and component mappings.
Without Code Connect configured, you can accomplish something similar by writing a skill in Claude Code that maps your Figma components to code. It won’t be as accurate, but its a good place to start.
Best for: Teams with a well-maintained Figma design system and Code Connect already configured (or willingness to set it up).
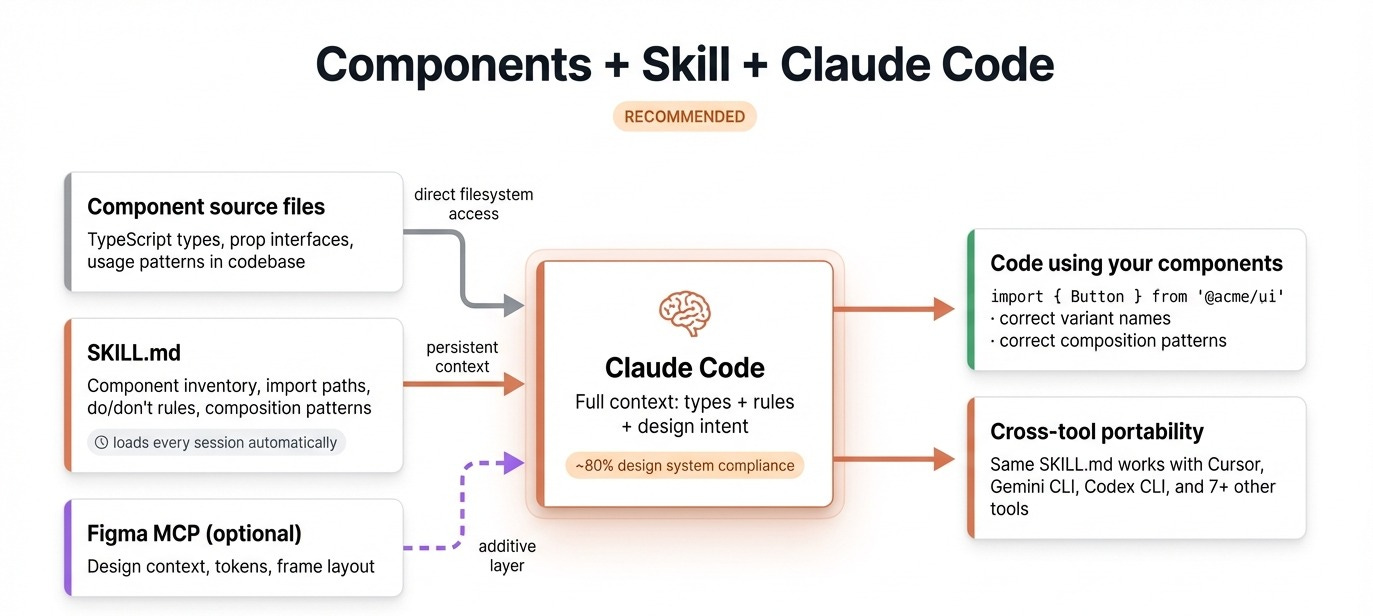
9. Components + custom skill + Claude Code
This is my recommended approach if you’re technical enough and focused on engineering handoff.
Your component library lives in the repo directly. You create a SKILL.md that documents what components you have and usage rules. Claude Code reads both the skill and the actual source files, which gives the AI a full understanding of how to use the components.
As an example, here’s the same dashboard comparison with Figma first and Claude Code + components + Figma MCP second:
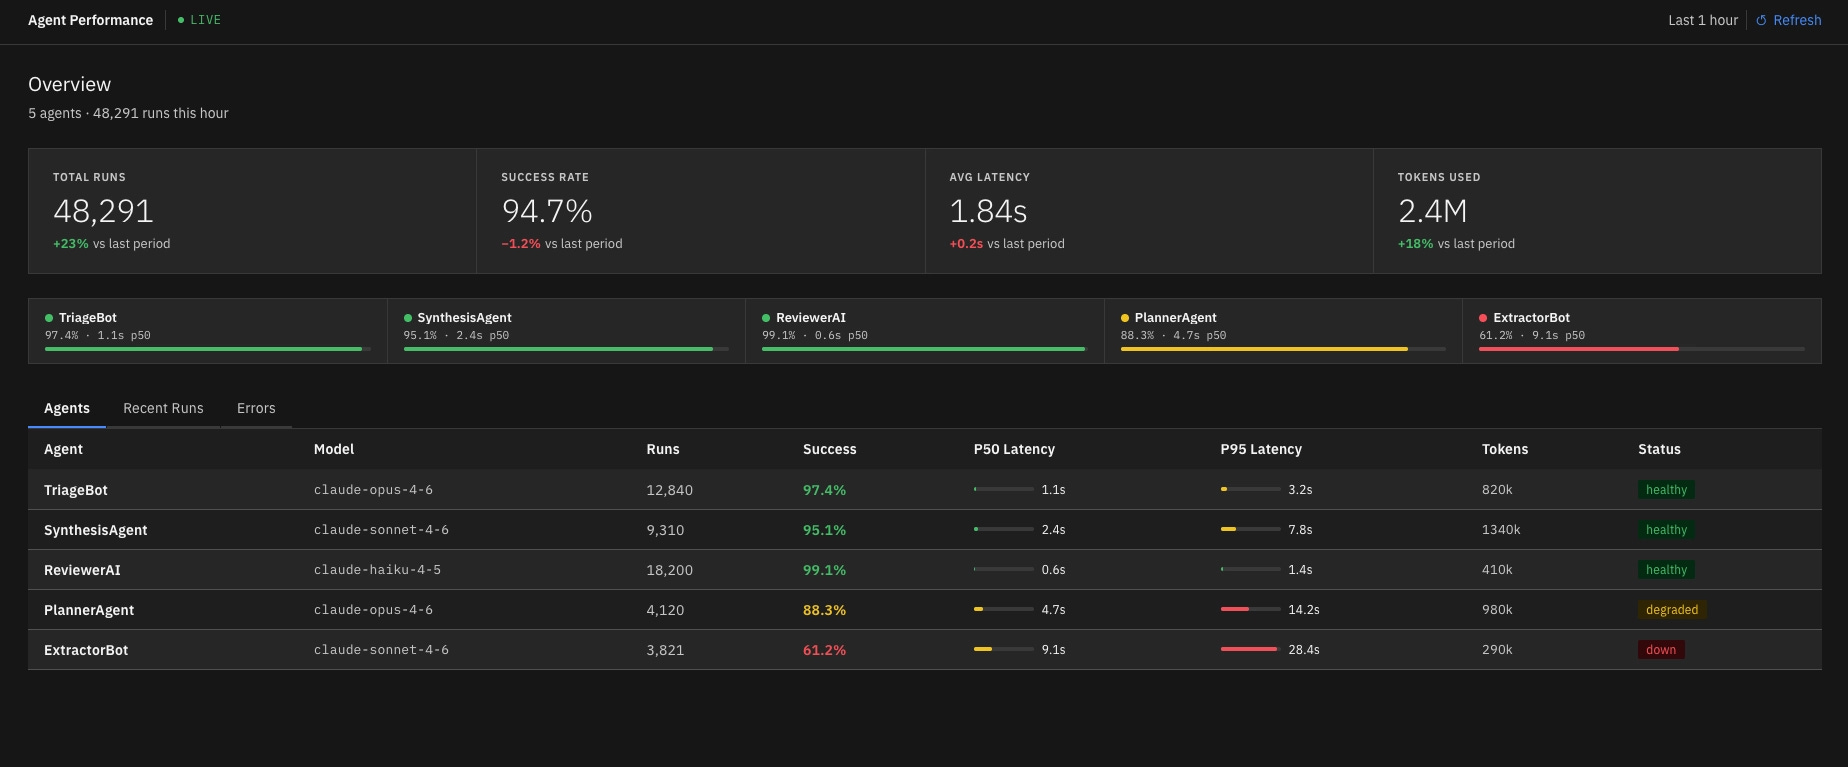
If you don’t want to working in the main repo, you can export just your components to a dedicated repo for prototyping. You can also pair this with screenshots or imports via Figma MCP to easily spin up interfaces for your ideas.
Best for: Teams that want maximum code & design fidelity between their design system and AI-generated prototypes.
Quick comparison
To wrap up, here’s a quick comparison chart of all the import methods covered in the post:
Where to start
If I had to recommend one thing to start with, it would be getting comfortable with Skills and MCP. Being able to move information between systems with MCP is a critical workflow, and learning how build Skills to document the exact instructions an AI should follow provides a lot of leverage.
Ultimately, the right approach depends on how technical your team is. Use web based tools like Bolt or Magic Patterns if you want a low barrier to entry. Use Claude Code + MCP + Skills for the best possible results.
I hope this breakdown was helpful in seeing all the ways teams are approaching this problem!
Would you be able to provide an example of the skill?